Friday, December 19, 2008

Zenoss 2.3.2 LDAP authentication with Ubuntu 8.04 and the stack installer

I was able to get the Active Directory authentication module loaded for our Ubuntu Server 8.04 stack installer-based Zenoss 2.3.2 installation. There is a bit of confusion about how to do this, as the wiki instructions for setup assume you are using the RPM-based installer or have installed from source. This turned out to not be too difficult given that the Ubuntu 8.04 distribution comes with the python-ldap package. In summary, you need to link in the distribution's installed python-ldap components into the site packages path for Zenoss's local Python 2.4 runtime and compile them. Here are the steps (these assume you have already downloaded and placed the LDAPUserFolder and LDAPMultiPlugins packages in the path identified in the wiki instructions):

Install python-ldap
(As root)
aptitude install python-ldap
Link python-ldap components to Zenoss's site packages path
We need the _ldap.so binary compiled against Python 2.4 and the source files. As the zenoss user:
#The Zenoss local Python site package path is $ZENHOME/lib/python!
cd $ZENHOME/lib/python
mkdir ldap
mkdir ldap/schema
ln -s /usr/share/pyshared/ldif.py
ln -s /usr/share/pyshared/ldapurl.py
ln -s /usr/lib/python2.4/site-packages/_ldap.so
cd ldap
ln -s /usr/share/pyshared/ldap/async.py
ln -s /usr/share/pyshared/ldap/controls.py
ln -s /usr/share/pyshared/ldap/filter.py
ln -s /usr/share/pyshared/ldap/__init__.py
ln -s /usr/share/pyshared/ldap/modlist.py
ln -s /usr/share/pyshared/ldap/cidict.py
ln -s /usr/share/pyshared/ldap/dn.py
ln -s /usr/share/pyshared/ldap/functions.py
ln -s /usr/share/pyshared/ldap/ldapobject.py
ln -s /usr/share/pyshared/ldap/sasl.py
cd schema
ln -s /usr/share/pyshared/ldap/schema/__init__.py
ln -s /usr/share/pyshared/ldap/schema/models.py
ln -s /usr/share/pyshared/ldap/schema/subentry.py
ln -s /usr/share/pyshared/ldap/schema/tokenizer.py
Compile .py files
Now that we have the files linked in from the global shared Python path (where the python-ldap deb installer put them), we need to compile all of the .py files using Zenoss's local python 2.4 installation:
cd $ZENHOME/lib/python
python /usr/local/zenoss/python/lib/python2.4/py_compile.py ldif.py
python /usr/local/zenoss/python/lib/python2.4/py_compile.py ldapurl.py
cd ldap
python /usr/local/zenoss/python/lib/python2.4/py_compile.py *.py
cd schema
python /usr/local/zenoss/python/lib/python2.4/py_compile.py *.py
Now that everything is compiled, restart zope (as zenoss, zopectl restart) and you can proceed with the rest of the instructions in the above wiki article. You will now see the ActiveDirectory Multi Plugin in the plugin list on the http://zenoss-installation:8080/zport/acl_users/manage_workspace page.

Tuesday, December 16, 2008

Faster DFS recovery application

In trying to set up DFS replication, we had a number of files that were not present in both the primary DFS partner and the destination partner. In this case, DFS will move all of the files "missing" from the primary partner out of the tree and into a separate pre-existing path on each destination volume. Microsoft will provide you with a recovery script that calls xcopy to, based on the generated PreExistingManifest.xml file, move the files back into their original locations.

The problem we had was that shelling out to xcopy when you have millions of relatively small files was going to take, well, months to complete. I built the following .NET (3.5, C#) console application which proved to do this at hundreds of times the rate of the Microsoft script. The only issue is that it does not replicate permissions; since we did not need that for our recovery, it fit the bill.

Please use at your own risk. I make no warranties. I recommend specifying an alternate recovery path when calling the application so you can validate output first.

using System;
using System.Collections.Generic;
using System.IO;
using System.Linq;
using System.Text;
using System.Xml.Linq;

namespace DFSRecovery
{
/// <summary>
/// Handles copying DFS files back into the original folder structure.
/// </summary>
class Program
{
/// <summary>
/// The main application loop.
/// </summary>
/// <param name="args">The args. See usage text.</param>
static void Main(string[] args)
{
if (args.Length < 3)
{
Console.WriteLine("\nDFSRecovery version " + System.Reflection.Assembly.GetExecutingAssembly().GetName().Version.ToString() + " [Arthur Penn, http://devarthur.blogspot.com]");
Console.WriteLine("Usage: DFSRecovery.exe \"\\\\path\\to\\PreExistingManifest.xml\" \"\\\\path\\to\\pre-existing\\folder\" \"\\\\path\\to\\output\\folder\" [print only=true|false]");
Environment.Exit(1);
}

// Load the PreExistingManifest.xml document and select the values we need
var doc = XDocument.Load(args[0]);
string preExistingFolder = args[1];
string outputFolder = args[2];
bool printOnly = false;
if (args.Length > 3)
{
printOnly = bool.Parse(args[3]);
}

int rc = 0;

var actions = from n in doc.Descendants("Resource")
select new {
FileOrFolder = ((string)n.Descendants("Attributes").First()),
Source = Path.Combine(preExistingFolder, (string)n.Descendants("NewName").First()),
Destination = Path.Combine(outputFolder, ((string)n.Descendants("Path").First()).Substring(7,
((string)n.Descendants("Path").First()).Length - 7))
};

foreach (var item in actions)
{
try
{
if (File.Exists(item.Source))
{
if (File.Exists(item.Destination))
{
if (printOnly)
{
Console.WriteLine("Target file exists: \"" + item.Destination + "\"");
}
}
else
{
CopyFile(item.Source, item.Destination, printOnly);
}
}
else
{
// It's a directory
CopyDirectory(item.Source, item.Destination, printOnly);
//break;
}
}
catch (Exception x)
{
rc = 1;
Console.WriteLine("Exception copying \"" + item.Source + "\" to \"" + item.Destination +
"\": " + x.ToString());
}
}

Environment.Exit(rc);
}

/// <summary>
/// Ensures the directory is present.
/// </summary>
/// <param name="path">The path.</param>
/// <param name="isDirectory">if set to <c>true</c> [is directory].</param>
/// <param name="printOnly">if set to <c>true</c> [print only].</param>
static void EnsureDirectory(string path, bool isDirectory, bool printOnly)
{
string targetFolder = (isDirectory ? path : path.Substring(0, path.LastIndexOf("\\")));
if (Directory.Exists(targetFolder))
{
if (printOnly)
{
Console.WriteLine("Target folder exists: \"" + targetFolder + "\"");
}
}
else
{
if (printOnly)
{
Console.WriteLine("Creating target folder: \"" + targetFolder + "\"");
}
else
{
Directory.CreateDirectory(targetFolder);
}
}
}

/// <summary>
/// Copies the directory.
/// </summary>
/// <param name="sourcePath">The source path.</param>
/// <param name="destinationPath">The destination path.</param>
/// <param name="printOnly">if set to <c>true</c> [print only].</param>
static void CopyDirectory(string sourcePath, string destinationPath, bool printOnly)
{
EnsureDirectory(destinationPath, true, printOnly);
foreach (string file in Directory.GetFiles(sourcePath))
{
//#if DEBUG
// Console.Write("From CopyDirectory: ");
//#endif
string fileName = file.Substring(file.LastIndexOf("\\") + 1);
CopyFile(file, Path.Combine(destinationPath, fileName), printOnly);
}

// Recursively process directories
foreach (string directory in Directory.GetDirectories(sourcePath))
{
string sourceSubDirectory = directory.Substring(directory.LastIndexOf("\\") + 1);
string destinationSubDirectory = Path.Combine(destinationPath, sourceSubDirectory);

CopyDirectory(directory, destinationSubDirectory, printOnly);
}
}

/// <summary>
/// Copies the file.
/// </summary>
/// <param name="sourcePath">The source path.</param>
/// <param name="destinationPath">The destination path.</param>
/// <param name="printOnly">if set to <c>true</c> [print only].</param>
static void CopyFile(string sourcePath, string destinationPath, bool printOnly)
{
if (printOnly)
{
Console.WriteLine("Copying \"" + sourcePath + "\" to \"" + destinationPath + "\"");
}
else
{
EnsureDirectory(destinationPath, false, printOnly);
File.Copy(sourcePath, destinationPath);
}
}
}
}

Thursday, November 13, 2008

Capturing Control Key Sequences in Silverlight 2

It took me a while to locate this, but I found in this MSDN article how to capture control key sequences in Silverlight 2. I was expecting to be able to 'and' the control key with the pressed alpha key, but that's not the way it works. I attached the following event handler to my layout root grid's KeyUp event. This performs a 'save' when pressing Ctrl+S, and 'save and close' when pressing Ctrl+Shift+S:

        /// <summary>
        /// Handles keyboard shortcuts.
        /// </summary>
        /// <param name="sender">Event sender.</param>
        /// <param name="e">Event args.</param>
        private void LayoutRoot_KeyUp(object sender, KeyEventArgs e)
        {
            if ((Keyboard.Modifiers & ModifierKeys.Control) == ModifierKeys.Control)
            {
                switch (e.Key)
                {
                    case Key.S:
                        // Ctrl+S: save; Ctrl+Shift+S: save and close
                        e.Handled = true;
                        SaveMyItem((Keyboard.Modifiers & ModifierKeys.Shift) == ModifierKeys.Shift);
                        break;
                }
            }
        }

Tuesday, October 28, 2008

Compiling Mono 2.0.1 on Ubuntu Gutsy Server 8.04

I didn't want to use the aging Mono version present in Ubuntu Server 8.04, so I set out to compile Mono 2.0 (and subsequently 2.0.1, via the same process). This turned out not to be too bad.

First, install the requisite packages:
aptitude install build-essential swig autoconf gawk mono-common binfmt-support bison pkg-config libglib2.0-dev
Yes, that's not a typo--you do want one of Ubuntu's Mono packages, mono-common. This will enable shell execution of Mono executables via ./ notation rather than having to execute "mono /path/to/executable."

Once you are done, download and unpack the source for Mono. This will get you 2.0.1:
wget http://ftp.novell.com/pub/mono/sources/mono/mono-2.0.1.tar.bz2
tar xf mono-2.0.1.tar.bz2

Now you are ready to build and install Mono (the make step will take a while):
cd mono-2.0.1
./configure --with-libgdiplus=no
make
make install
Lastly, you need one symlink so the binfmt-support package can execute Mono executables directly via the shell:
ln -s /usr/local/bin/mono /usr/bin/cli
That's it. Typing the command "mono -V" should yield the about information for Mono 2.0.1. Follow the instructions under "Testing the Mono installation" and confirm you can not only build and execute the example.exe application, but that you can execute it with ./ notation (e.g. ./example.exe).

Cheers!

Thursday, October 09, 2008

D-Link DWL-G122 wireless USB adapter on Vista

I have a D-Link DWL-G122 wireless adapter (B/G) that I wanted to get working on Vista. I found a few posts, including this forum thread, but nothing worked for me. It turns out I have an older revision B adapter... and I ended up getting this to work by installing the Windows XP drivers for the revision B from D-Link:

ftp://files.dlink.com.au/products/DWL-G122/REV_B/Drivers/

I installed this by right-clicking the adapter in Device Manager, choosing:
  1. Update Driver Software...
  2. Browse my computer for driver software
  3. Let me pick from a list of device drivers on my computer
  4. Network Adapters category
  5. "Have Disk" button... then finally browsing to the extracted contents of the above driver.
Enjoy.

Sunday, October 05, 2008

Vista power saving never activates... thoughts?

I was hoping for some help with getting Vista's power saving to function. I have a Windows Vista Business Service Pack 1 (x64) installation. I have power options set up as follows:

Turn off the display:
[on battery] 5 minutes
[plugged in] 20 minutes

Put the computer to sleep:
[on battery] 15 minutes
[plugged in] 1 hour

Initially, power saving was working as expected. However, now it never enters power saving mode or even turns off the monitor. I have tried changing the plan settings around (including changing from one plan to another and creating a custom plan with the desired settings) with no success.

Does anyone have any ideas?

** UPDATE 28 Oct ** This was caused by the Vista Photos screensaver! Other screensavers allowed power saving to function, but the Photos screensaver did not.

Wednesday, October 01, 2008

MOSS doesn't like having the indexer role moved

We needed to expand our MOSS farm from one server to two so that we could have the search and indexing performed by a second machine, as we were putting the one poor server under significant periodic load. So, we stood up the second instance and joined it to the farm, and attempted to assign the search and indexing roles to this new instance. After doing so, when we would go to the search settings link in the SSP, we got the following message:

“The search service is currently offline. Visit the Services on Server page in SharePoint Central Administration to verify whether the service is enabled. This might also be because an indexer move is in progress.”

I searched and found wildly different solutions for fixing this. I ended up doing the following things to correct it:
  1. On the new index server, I had to stop and restart the Office Search role after the initial move. I did this with stsadm via the following commands: 1) stsadm -o osearch -action stop 2) stsadm -o osearch -action start -role IndexQuery -farmserviceaccount DOMAIN\accountname -farmservicepassword PASSWORD
  2. Access the SSP administration page (http://url-of-central-admin/_admin/managessp.aspx), and on the drop-down menu for the SSP in question, choose Edit Properties.
  3. In the section titled Process Accounts with access to this SSP, add the search service account to the dialog box.
  4. In the section titled Index Server, select the new index server for the farm.
  5. Click OK to apply your changes.
  6. Reboot the index server and restart full crawls of the content sources.

Thursday, September 25, 2008

Enable Silverlight in MOSS - web.config changes

I know there are numerous articles on this, but here are the web.config changes I made to enable Silverlight in Microsoft Office SharePoint Server 2007 (modified parent node names in bold):

configuration/configSections

<sectionGroup name="system.web.extensions" type="System.Web.Configuration.SystemWebExtensionsSectionGroup, System.Web.Extensions, Version=3.5.0.0, Culture=neutral, PublicKeyToken=31BF3856AD364E35">
<sectionGroup name="scripting" type="System.Web.Configuration.ScriptingSectionGroup, System.Web.Extensions, Version=3.5.0.0, Culture=neutral, PublicKeyToken=31BF3856AD364E35">
<section name="scriptResourceHandler" type="System.Web.Configuration.ScriptingScriptResourceHandlerSection, System.Web.Extensions, Version=3.5.0.0, Culture=neutral, PublicKeyToken=31BF3856AD364E35" requirePermission="false" allowDefinition="MachineToApplication" />
<sectionGroup name="webServices" type="System.Web.Configuration.ScriptingWebServicesSectionGroup, System.Web.Extensions, Version=3.5.0.0, Culture=neutral, PublicKeyToken=31BF3856AD364E35">
<section name="authenticationService" type="System.Web.Configuration.ScriptingAuthenticationServiceSection, System.Web.Extensions, Version=3.5.0.0, Culture=neutral, PublicKeyToken=31BF3856AD364E35" requirePermission="false" allowDefinition="MachineToApplication" />
<section name="jsonSerialization" type="System.Web.Configuration.ScriptingJsonSerializationSection, System.Web.Extensions, Version=3.5.0.0, Culture=neutral, PublicKeyToken=31BF3856AD364E35" requirePermission="false" allowDefinition="Everywhere" />
<section name="profileService" type="System.Web.Configuration.ScriptingProfileServiceSection, System.Web.Extensions, Version=3.5.0.0, Culture=neutral, PublicKeyToken=31BF3856AD364E35" requirePermission="false" allowDefinition="MachineToApplication" />
<section name="roleService" type="System.Web.Configuration.ScriptingRoleServiceSection, System.Web.Extensions, Version=3.5.0.0, Culture=neutral, PublicKeyToken=31BF3856AD364E35" requirePermission="false" allowDefinition="MachineToApplication" />
</sectionGroup>
</sectionGroup>
</sectionGroup>

configuration/system.web/httpHandlers

<remove verb="*" path="*.asmx" />
<add verb="*" path="*.asmx" validate="false" type="System.Web.Script.Services.ScriptHandlerFactory, System.Web.Extensions, Version=3.5.0.0, Culture=neutral, PublicKeyToken=31BF3856AD364E35" />
<add verb="*" path="*_AppService.axd" validate="false" type="System.Web.Script.Services.ScriptHandlerFactory, System.Web.Extensions, Version=3.5.0.0, Culture=neutral, PublicKeyToken=31BF3856AD364E35" />
<add verb="GET,HEAD" path="ScriptResource.axd" type="System.Web.Handlers.ScriptResourceHandler, System.Web.Extensions, Version=3.5.0.0, Culture=neutral, PublicKeyToken=31BF3856AD364E35" validate="false" />

configuration/system.web/httpModules

<add name="ScriptModule" type="System.Web.Handlers.ScriptModule, System.Web.Extensions, Version=3.5.0.0, Culture=neutral, PublicKeyToken=31BF3856AD364E35" />
<add name="Session" type="System.Web.SessionState.SessionStateModule" />

configuration/system.web/compilation/assemblies

<add assembly="System.Core, Version=3.5.0.0, Culture=neutral, PublicKeyToken=B77A5C561934E089" />
<add assembly="System.Data.DataSetExtensions, Version=3.5.0.0, Culture=neutral, PublicKeyToken=B77A5C561934E089" />
<add assembly="System.Web.Extensions, Version=3.5.0.0, Culture=neutral, PublicKeyToken=31BF3856AD364E35" />
<add assembly="System.Web.Silverlight, Version=2.0.5.0, Culture=neutral, PublicKeyToken=31BF3856AD364E35" />
<add assembly="System.Xml.Linq, Version=3.5.0.0, Culture=neutral, PublicKeyToken=B77A5C561934E089" />

configuration/system.web/pages

<controls>
<add tagPrefix="asp" namespace="System.Web.UI.WebControls" assembly="System.Web.Extensions, Version=3.5.0.0, Culture=neutral, PublicKeyToken=31BF3856AD364E35" />
<add tagPrefix="asp" namespace="System.Web.UI" assembly="System.Web.Extensions, Version=3.5.0.0, Culture=neutral, PublicKeyToken=31BF3856AD364E35" />
</controls>

configuration

<system.web.extensions>
<scripting>
<webServices />
</scripting>
</system.web.extensions>

Thursday, September 11, 2008

Customing Microsoft Dynamics CRM 4.0 menus and toolbars

I've been embarking on a new adventure of staging Microsoft Dynamics CRM 4.0 for my company to replace a home-grown, ad-hoc CRM system. As part of this, I have needed to customize some of its menus and toolbars.

The basic mechanism for doing this is to:

1. Enable ISV Config. You do this by navigating to Settings | Administration | System Settings | Customization tab, then choosing one of the client options under "Custom menus and toolbars:"
2. Once done, export the ISV Config and change it. To get a copy of it, go to Settings | Customization | Export Customizations, select the ISV Config item, and click the Export Selected Customizations button.

You should either keep a copy of this file for reference before changing it, as it contains many sample objects, or at least refer to this MSDN article which references possibly the same sample.

You may wonder how to get rid of all the default customizations present in the initial sample--it's chock full of menus, toolbars, etc. Here is the minimal ISV Config XML structure without any of the sample objects. Add your own objects to this minimal file, and then...

3. Re-import your modified ISV.config.xml file (Settings | Customization | Import Customizations). MS CRM validates the XML upon upload, not upon import, so you will receive a notice of any validation errors immediately upon clicking the Upload button. Don't forget to click the Import Selected Customizations button after you have a successful upload. :)

Monday, September 08, 2008

Silverlight web part - Code Access Security and Startup Permissions

I built a web part based upon the Silverlight 2 beta 2 guidance and encountered an interesting situation. If a user that did not have administrative privileges on the web server was the first to browse the portal hosting the web part, the user would simply receive a 403 (Forbidden) error page.

I had been working with a web part installer based upon the SharePoint Solution Installer (an excellent project to simplify installation of web part packages), and my WSP specified a custom code access security policy. Additionally, my web part referenced Enterprise Library 4.0 assemblies that I had built and signed. So my troubleshooting initially focused around the following:
  • Changing the custom code access security policy to grant unrestricted access to the web part (no effect);
  • Changing the trust level for the entire WSS site to Full (no effect);
  • Registering the Ent Lib assemblies via InstallUtil (no effect);
  • Adding the Ent Lib assemblies to the GAC (they were running in bin before--no effect);
  • Removing all reference to Ent Lib from my web part assembly (no effect).
Finally, I added System.Web.Silverlight.dll to the GAC, and voila--the site started working. I backed out all other changes and it continued working.

In case it helps, I believe this is the minimal CAS policy for a web part that hosts an application via Silverlight:

<CodeAccessSecurity>
<PolicyItem>
<PermissionSet Name="Web Part Permission Set" class="NamedPermissionSet" version="1" Description="Permission set for Silverlight-hosting web part">
<IPermission class="AspNetHostingPermission" version="1" Level="Medium" />
<IPermission class="SecurityPermission" version="1" Flags="Execution" />
<IPermission class="Microsoft.SharePoint.Security.SharePointPermission, Microsoft.SharePoint.Security, version=12.0.0.0, Culture=neutral, PublicKeyToken=71e9bce111e9429c"
version="1" ObjectModel="True" />
</PermissionSet>
<Assemblies>
<Assembly Name="My.WebPart" Version="1.0.0.0" PublicKeyBlob="---insert long encoded public key blob extracted with sn -Tp here ---" />
</Assemblies>
</PolicyItem>
</CodeAccessSecurity>

Thursday, September 04, 2008

Windows Desktop Search 4.0 + TrueCrypt = crash?

I used TrueCrypt to encrypt the entire system disk for a Vista x64 installation. Everything was running fine on this, until suddenly I started having frequent (every 40-50 minutes) crashes. I had just installed Visual Studio 2008, so I thought perhaps the SQL Express instance it installed was causing some incompatibility... but after disabling those services, and in fact removing every piece of VS 2008, I was still suffering the crashes.

Finally I waded through the recent updates and noticed that Windows Desktop Search 4.0 had been recently applied. I can't prove this, but I think I may have rebooted (and hence the service got started) during my application updates. Regardless, I stopped and disabled the service and have had no crashes since.

I did set Vista to record crash dumps, but it always fails to load the crash dump driver, and so I was not able to capture any data about the crashes I experienced. Has anyone else experienced problems with this combination of applications? The system drive has a single partition and is NTFS-formatted within the TrueCrypt container, for what it's worth.

Wednesday, September 03, 2008

WCF web service setup with integrated security

I found setting up a WCF web service to use Windows integrated security to be a somewhat less-than-transparent process, so I thought I'd publish the steps I used to make it work.

Set IIS to allow Negotiate authentication in addition to NTLM

To do this, you need to find the web site identifier. In IIS 6.0, run IIS Manager and choose the Web Sites node and note the identifier of the web site that will host your web service:

Once done, drop to a command prompt and execute the following:
cscript C:\inetpub\AdminScripts adsutil.vbs GET w3svc/<identifier from above>/root/NTAuthenticationProviders
For example:
cscript C:\inetpub\AdminScripts adsutil.vbs GET w3svc/174926873/root/NTAuthenticationProviders

This will report output like the following:
Microsoft (R) Windows Script Host Version 5.6
Copyright (C) Microsoft Corporation 1996-2001. All rights reserved.

NTAuthenticationProviders : (STRING) "Negotiate,NTLM"
If the NTAuthenticationProviders node reads "Negotiate,NTLM" you need make no changes. If it reads simply "NTLM" you must set it as follows:
cscript C:\inetpub\AdminScripts adsutil.vbs SET w3svc/<identifier from above>/root/NTAuthenticationProviders "Negotiate,NTLM"
Use at most one host header

There are workarounds, but out of the box you will get errors if you have more than one host header configured on the IIS web.

Set Windows integrated security, except for the .svc file


In IIS Manager's Directory Security tab for the web site (accessed via right-click | Properties), click Edit in the Authentication and access control section. At the web site level, Enable anonymous access should be unchecked and Integrated Windows authentication should be checked.

Now click on your web site to view its files. You should see the .svc file listed. Right-click this file and go to Properties:
This time, go to the File Security tab and click the Edit button in the Authentication and access control section. This file should have both anonymous access and integrated Windows authentication checked:
Use an integrated security binding

Lastly, you need to use an integrated security web service binding in web.config. Here is an example:
<system.serviceModel>
<bindings>
<basicHttpBinding>
<binding name="IntegratedBinding" maxBufferSize="2147483647" maxReceivedMessageSize="2147483647">
<readerQuotas maxArrayLength="2147483647" maxStringContentLength="2147483647" />
<security mode="TransportCredentialOnly">
<transport clientCredentialType="Windows" />
</security>
</binding>
</basicHttpBinding>
</bindings>
<behaviors>
<serviceBehaviors>
<behavior name="serviceBehavior">
<serviceMetadata httpGetEnabled="true" httpGetUrl="" />
<serviceDebug includeExceptionDetailInFaults="true" />
<!--<serviceAuthorization impersonateCallerForAllOperations="true" />-->
</behavior>
</serviceBehaviors>
</behaviors>
<services>
<service name="My.Service.OrderService" behaviorConfiguration="serviceBehavior">
<endpoint address="" binding="basicHttpBinding" bindingConfiguration="IntegratedBinding" name="integratedBasicHttpEndpoint" contract="My.Service.IOrderService" />
<endpoint address="mex" binding="mexHttpBinding" name="mexEndpoint" contract="IMetadataExchange" />
</service>
</services>
<serviceHostingEnvironment aspNetCompatibilityEnabled="false" />
</system.serviceModel>

Monday, August 25, 2008

Enterprise Library data block and return values

I've seen various posts discussing how to get return values from calls via the Enterprise Library data block, but many seemed convoluted. I didn't need multiple output parameters, just the one integer. Here's what I did to capture the return value from a stored procedure call:

Within the stored procedure
CREATE PROCEDURE [dbo].[GetReturnValue]
AS
RETURN 1

Enterprise Library call
Database db = DatabaseFactory.CreateDatabase();
DbCommand cmd = db.GetStoredProcCommand("dbo.GetReturnValue");
db.AddParameter(cmd, "return_value", DbType.Int32, ParameterDirection.ReturnValue, null, DataRowVersion.Default, null);

db.ExecuteNonQuery(cmd);

int myReturnValue = Convert.ToInt32(db.GetParameterValue(cmd, "return_value"));
HTH.

Sunday, August 17, 2008

Feeling insecure? Bothered by the economy?

While this blog has strictly been a technology-focused affair (all work and no play makes Jack a dull boy), a friend of mine has excellent insights on mental health and how recent turbulence in the economy affects us. If you're interested, I highly recommend his blog:
A Note to Myself and Whoever Else Cares

Copying files from Linux to Windows

If you ever have occasion to copy files from Linux to Windows, you may discover that this process is not as simple as it may seem. It's fairly easy to take a USB drive formatted with the FAT or NTFS filesystem and physically transport the files from one environment to the other, but there are other complexities you must manage:

1. File Naming Rules

On ext3 filesystems, one of the most common filesystems in the Linux world, there are many legal filenames that are illegal on Windows:
  • Filenames with double quotes (")
  • Filenames with colons (:)
  • Filenames with backslashes (\)
  • etc.
This script will, when executed from the path you wish to examine, rename the files so that they have legal names for Windows environments.

2. Path Length

While ext3 has no maximum length for paths and a 255-character limit for filenames, Windows' NTFS restricts each each path component (directory or filename) to a maximum of up to 255 characters long (from Wikipedia). You have to examine the source folders to confirm you don't have any path component names that are too long to copy. DO NOT TRUST THE SUCCESS OF THE FILE COPY TO VALIDATE THIS. It seems that the Linux NTFS implementation (at least on Ubuntu 8.04) allows paths that would be legal for ext3, and that work while the Linux machine is using the NTFS-formatted drive, but that are NOT legal when consumed by Windows.

3. Case Sensitivity

Windows filenames are not case-sensitive, but Linux filenames are. This means that if you have two files in one folder on the Linux source system as follows:
  • myDocument.doc
  • MyDocument.doc
Only one of these will copy to the destination, or odd errors will result when you attempt to copy them. To identify these issues, and to confirm you haven't been bitten by any of the above problems...

4. Compare, compare, compare

Always use a file and folder compare tool like WinMerge to make sure that everything did copy over properly. Make sure you investigate any differences it identifies, because those are likely issues with case-sensitivity, path lengths, or other problems. This prevents you from thinking you have a good copy of the file tree when you don't. I recommend editing WinMerge's compare options so that only the file size and time are considered when comparing the results of large copy operations so that the comparison completes in a timely fashion.

5. Text File Handling

Lastly, you must be aware that text files have different end-of-line delimiters on Linux vs. Windows. This means that at a minimum Windows programs that don't understand this (Notepad) will show the text all run together rather than having separate lines as it should be. Cross-platform applications using the files (e.g. the instant messenger application Pidgin) will fail on Windows because they expect Windows text file formats.

To avoid these issues, after getting a successful copy, use a Unix-to-Windows text file converter application. I have had good luck with EOL Converter (as an added bonus, it is also free. :) )

Friday, August 15, 2008

iTunes on Vista won't play any songs

This was annoying. iTunes 7.7 quit playing tracks--any tracks, not just DRM-infested ones--on my Vista installation recently. There was no sound after hitting play and the playhead would not progress. I ran down the suggestions from Apple about this problem to no avail.

After googling, I discovered this post where the author had trouble with video playback after attaching a ReadyBoost-configured USB drive. Sure enough, I removed my ReadyBoost drive and rebooted, and voila--iTunes is again playing songs.

Thursday, July 17, 2008

PerformancePoint 2007 Monitoring Server permissions

The Monitoring Server component of PerformancePoint 2007 is responsible for managing the user rights as far as being able to publish dashboards, edit existing dashboards, etc. This article got me most of the way there in understanding how to set up user permissions, but I think it's helpful to point out a few other items.

Dashboard Designer is the interface for Monitoring Server user security.
This was not immediately clear to me. There are two basic aspects to the permissions: global permissions (such as administrator rights, being able to publish new dashboards, etc.) and per-Dashboard permissions.

To configure server (global) role assignments:

In Dashboard Designer, hit the Office button and then the Options button on the resulting menu:


On the resulting Server tab, hit the Connect button:


Once it logs in, hit Permissions:


On the resulting Permissions dialog, you can add users in DOMAIN\name form, specifying their server (global) role:


To configure permissions for individual dashboards:

Open the desired dashboard On its Properties tab, there is a Permissions section at the bottom:


Add your users (DOMAIN\name format again) and specify Reader or Editor roles. After changing these permissions, you must publish the dashboard.

Vista Page File in Netherworld

I had an odd problem with a Windows Vista SP1 installation. I suddenly began getting "your computer is low on memory" warnings when nothing really had changed with the way I use the machine. I looked at Task Manager and saw that it was showing page file use of ~1700M / ~1800M. When I went to Advanced System Settings (System Properties) to examine the page file size (Advanced tab, Performance settings, then the Advanced tab again) it showed the total page file size as.... 0 MB!

I knew I had enabled a page file previously when I set up the machine, so I rebooted--and it still showed 0 MB for the page file size. So, I went to assign a new 4096 MB page file. When I did this, it gave me a message stating that pagefile.sys already existed (!) and asked if I wanted to overwrite it. I half expected the machine to die painfully when I approved this action, but it did not... and knock on particleboard, I haven't gotten any of the warnings since.

Thursday, July 10, 2008

WCF in .NET 3.5 SP1 and Enterprise Library - TypeInitializationException

I have been fighting a maddening issue. It seems that if you have a WCF service under the .NET 3.5 SP1 beta that is impersonating the caller--either using the ServiceModel pipeline or ASP.NET Compatibility Mode--calls to Enterprise Library assemblies (at least for logging or data access needs) will fail with the following exception:
"The type initializer for 'Microsoft.Practices.EnterpriseLibrary.Logging.LogEntry' threw an exception."
When you dig for the inner exception, you find:
Could not load file or assembly 'System.Management, Version=2.0.0.0, Culture=neutral, PublicKeyToken=b03f5f7f11d50a3a' or one of its dependencies. Access is denied.
I've tried numerous things to get around this, such as:
  • Changing the application pool identity to Local System
  • Directly referencing System.Management in the service assembly
  • Adding System.Management (and the Ent Lib assemblies, for that matter) to the <assemblies> node in the web.config
** Update - 11 Jul 2008: Client configuration changes were required to correct the problem. In the client's app.config, configure a behavior for the endpoint to allow impersonation:
<client>
<endpoint address="http://server/WcfService1/Service1.svc"
binding="basicHttpBinding" bindingConfiguration="BasicHttpBinding_IService1"
contract="ServiceReference2.IService1" name="BasicHttpBinding_IService1"
behaviorConfiguration="endpointBehavior"/>
</client>
<behaviors>
<endpointBehaviors>
<behavior name="endpointBehavior">
<clientCredentials>
<windows allowedImpersonationLevel="Impersonation"/>
</clientCredentials>
</behavior>
</endpointBehaviors>
</behaviors>
Then, for some reason, an IIS reset was needed to make the client start working. This article describes the problem in detail.

Here's the thread over on the Enterprise Library forums where I was corresponding about the issue.

Friday, June 27, 2008

Silverlight and REST for corporate (intranet) applications

Danger Will Robinson, Silverlight 2 beta 2's WebClient implementation does not support passing integrated security credentials. I was hoping to implement a RESTful services tier for my intranet Silverlight application using Windows Integrated Security. While this does work brilliantly when using IE as a client, the Silverlight client cannot call the services. There seems to be no good workaround: I could use ASP.NET authentication services using Forms authentication against AD, but I would have to present the client with a login prompt.

FYI, the service configuration for WCF REST and integrated security is as follows:

<system.serviceModel>
<behaviors>
<endpointBehaviors>
<behavior name="webBehavior">
<webHttp/>
<!--<enableWebScript/>-->
</behavior>
</endpointBehaviors>
</behaviors>

<serviceHostingEnvironment aspNetCompatibilityEnabled="true" />

<bindings>
<webHttpBinding>
<binding name="integratedWebHttpBinding">
<security mode="TransportCredentialOnly">
<transport clientCredentialType="Windows"/>
</security>
</binding>
</webHttpBinding>
</bindings>

<services>
<service name="AppNamespace.Service">
<endpoint address=""
behaviorConfiguration="webBehavior"
binding="webHttpBinding"
bindingConfiguration="integratedWebHttpBinding"
contract="AppNamespace.Service" />
</service>
</services>
</system.serviceModel>

Wednesday, June 25, 2008

MOSS and Kerberos on Windows Server 2008 - a gotcha

I've been through the Kerberos mill repeated times--getting the SPNs lined up, making sure the computer and service accounts are trusted for delegation, making sure the times on the servers are within 15 minutes, etc. But I couldn't make Kerberos authentication work on my MOSS web applications on a Windows Server 2008 server.

I opened a ticket on this with Microsoft and discovered that IIS 7.0 has kernel mode authentication turned on by default. MOSS has a problem with this and it will completely break Kerberos for those web applications. To turn this off:

In Server Manager, select the web application for which you want to fix Kerberos authentication:


Select its Authentication tool:


Now choose Advanced Settings:


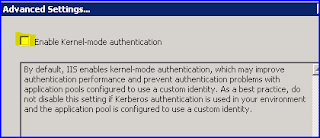
Finally, make sure the "Enable Kernel-mode authentication" checkbox is UNCHECKED:


Apply your changes and you should be good to go. It is not necessary to reset IIS or bounce the application pool to make it take effect. Don't forget that you still have to configure the web in MOSS Central Administration to use Kerberos (Negotiate) authentication instead of NTLM in addition to all the other normal domain-based Kerberos setup steps. Cheers.

** UPDATE 24 Mar 2009 **
Apparently the kernel mode authentication setting also breaks NTLM authentication on WS 2008, so this is not specific to making Kerberos work.

Friday, June 13, 2008

Moving Silverlight 2 beta 1 applications to beta 2

With new times come a new Silverlight beta, released last week. I set out to update my beta 1 applications to beta 2. First, I let it run the project through the upgrade wizard. After that, I found there were several more steps, starting with fixing your installation...

Remove and Re-Add System.Windows References

This includes:
  • System.Windows
  • System.Windows.Browser
  • System.Windows.Controls.Data
  • System.Windows.Controls.Extended (this one will likely not be needed now as many controls have moved into the base assemblies)
Update Namespaces of the Silverlight User Control and Application Objects

Make this change in App.xaml and any other user control (*.xaml) objects.

From:
xmlns="http://schemas.microsoft.com/client/2007"
To:
xmlns="http://schemas.microsoft.com/winfx/2006/xaml/presentation"
This avoids mystery "invalid XAML" errors from the Silverlight control on web pages:
Sys.InvalidOperationException: Invalid XAML for control 'Xaml1'. [] (line 1, col 229): The element is not valid in the given namespace.
Update the Deployment Node Namespace in AppManifest.xaml

From:
<Deployment xmlns="http://schemas.microsoft.com/client/2007/deployment" xmlns:x="http://schemas.microsoft.com/winfx/2006/xaml" EntryPointAssembly="HCHB.ServiceRequests" EntryPointType="HCHB.ServiceRequests.App" RuntimeVersion="2.0.30226.2">
To:
<Deployment xmlns="http://schemas.microsoft.com/client/2007" xmlns:x="http://schemas.microsoft.com/winfx/2006/xaml" EntryPointAssembly="HCHB.ServiceRequests" EntryPointType="HCHB.ServiceRequests.App" RuntimeVersion="2.0.30523.6">
Update the Silverlight Control Declaration

Find the Silverlight control on the web page(s) in your site and update the node accordingly, from:
<asp:Silverlight ID="Xaml1" runat="server" Source="~/ClientBin/Silverlight1.xap" Version="2.0" Width="100%" Height="100%" />
To:
<asp:Silverlight ID="Silverlight1" runat="server" Source="~/ClientBin/Silverlight1.xap" MinimumVersion="2.0.30523" Width="100%" Height="100%" />
Change the Cross-Domain Access Policy

This prevents 404 errors when calling my web services.

From:
<?xml version="1.0" encoding="utf-8"?>
<access-policy>
<cross-domain-access>
<policy>
<allow-from>
...
To:
<?xml version="1.0" encoding="utf-8"?>
<access-policy>
<cross-domain-access>
<policy>
<allow-from http-request-headers="*">
...


Saturday, May 31, 2008

FreeMind manual installation in Ubuntu Hardy 8.04

So you like the mind mapping software FreeMind, but the distribution package for Ubuntu 8.04 is hideously out of date. Your solution awaits... simply by installing FreeMind from source. While this is fairly easy to follow, there is some complexity with getting full desktop integration. I am including the steps I followed, but if you scroll all the way to the bottom, you can find a compiled archive with 0.9.0 beta 17 included with a script to do all the work referenced in the article.

First, you need a few packages (if you are going to use the version of FreeMind I compiled below, you do not need sun-java6-jdk):

sudo aptitude install sun-java6-jre sun-java6-fonts sun-java6-jdk


Now download FreeMind. I recommend the latest beta version, found here. You will also need to download Apache Ant. There is an Ant package in the Hardy repositories, but it is broken, so you will need the binaries directly from Apache. I used 1.7.0, the latest version available at the time of this article.

Unpack Ant and copy it to its destination (execute the following in a terminal wherever you placed the downloaded Ant archive):

tar xf apache-ant-1.7.0-bin.tar.bz2
sudo mkdir /usr/local/ant
sudo mv apache-ant-1.7.0/* /usr/local/ant


Set up Ant's environment variables:

gksu gedit /etc/rc.local

# In gedit, append the following to this file before "exit 0":

export ANT_HOME=/usr/local/ant
export PATH=${PATH}:${ANT_HOME}/bin


Reboot for the above to take effect, or just execute the two export commands within your current terminal. Now you are ready to compile FreeMind. Unpack it and build it with Ant:

tar xf freemind-src-0.9.0_Beta_17.tar.gz
cd freemind
ant


Now copy the built contents of the dist folder into /opt/freemind, and set up the executable:

sudo mkdir /opt/freemind
sudo cp -R ../bin/dist/* /opt/freemind
sudo chmod +x /opt/freemind/freemind.sh
sudo ln -s /opt/freemind/freemind.sh /usr/local/bin/freemind


Congratulations, you can now run FreeMind by simply typing the command: freemind

The harder part was registering the x-freemind MIME type and getting Gnome to open .mm files with a double-click (and having an icon assigned to those files!). For the MIME type, there are two existing conflicting MIME types you will have to get rid of: x-troff-mm and x-matlab. As I have no use for these applications, this is not a problem for me. These are defined in /usr/share/mime/packages/freedesktop.org.xml, and you have to comment out the nodes as follows:

<!--
<mime-type type="text/x-matlab">
<sub-class-of type="text/plain"/>
<comment>MATLAB script/function</comment>
<comment xml:lang="bg">Скрипт/функци� — MATLAB</comment>
<comment xml:lang="ca">script/funció MATLAB</comment>
<comment xml:lang="cs">Skript/funkce MATLAB</comment>
<comment xml:lang="de">MATLAB-Skript/-Funktion</comment>
<comment xml:lang="en_GB">MATLAB script/function</comment>
<comment xml:lang="es">script/función de MATLAB</comment>
<comment xml:lang="eu">MATLAB script/funtzioa</comment>
<comment xml:lang="fi">MATLAB-skripti/funktio</comment>
<comment xml:lang="fr">script/fonction MATLAB</comment>
<comment xml:lang="hu">MATLAB parancsfájl/funkció</comment>
<comment xml:lang="it">Script/Funzione MATLAB</comment>
<comment xml:lang="ja">MATLAB スクリプト/関数</comment>
<comment xml:lang="ko">MATLAB 스�립트/함수</comment>
<comment xml:lang="nb">Skript/funksjon for MATLAB</comment>
<comment xml:lang="nl">MATLAB-script/functie</comment>
<comment xml:lang="nn">MATLAB-skript/funksjon</comment>
<comment xml:lang="pl">Skrypt/funkcja MATLABa</comment>
<comment xml:lang="pt_BR">Script/função do MATLAB</comment>
<comment xml:lang="sv">MATLAB-skript/funktion</comment>
<comment xml:lang="uk">Сценарій/функці� MATLAB</comment>
<comment xml:lang="vi">Văn lệnh/chức năng MATLAB</comment>
<magic priority="10">
<match value="%" type="string" offset="0"/>
</magic>
<magic priority="50">
<match value="function" type="string" offset="0"/>
</magic>
<glob pattern="*.m"/>
<alias type="text/x-octave"/>
</mime-type>
-->


...and....

<!--
<mime-type type="text/x-troff-mm">
<sub-class-of type="text/plain"/>
<comment>Troff MM input document</comment>
<comment xml:lang="bg">Изходен документ — Troff MM</comment>
<comment xml:lang="ca">document d'entrada Troff MM</comment>
<comment xml:lang="cs">Vstupní dokument Troff MM</comment>
<comment xml:lang="da">Troff MM inddata-dokument</comment>
<comment xml:lang="de">Troff-MM-Eingabedokument</comment>
<comment xml:lang="el">έγγ�αφο/π�όγ�αμμα εντολών troff MM</comment>
<comment xml:lang="en_GB">Troff MM input document</comment>
<comment xml:lang="eo">eniga dokumento de Troff MM</comment>
<comment xml:lang="es">documento de entrada Troff MM</comment>
<comment xml:lang="eu">Troff MM sarrerako dokumentua</comment>
<comment xml:lang="fi">Troff MM -syöteasiakirja</comment>
<comment xml:lang="fr">document d'entrée Troff MM</comment>
<comment xml:lang="hu">Troff MM bemeneti dokumentum</comment>
<comment xml:lang="it">Documento di input Troff MM</comment>
<comment xml:lang="ja">Troff MM 入力ドキュメント</comment>
<comment xml:lang="ko">Troff MM input 문서</comment>
<comment xml:lang="lt">Troff MM įvesties dokumentas</comment>
<comment xml:lang="ms">Dokumen input Troff MM</comment>
<comment xml:lang="nb">Troff MM-inndatadokument</comment>
<comment xml:lang="nl">Troff MM-invoerdocument</comment>
<comment xml:lang="nn">Troff MM inndata-dokument</comment>
<comment xml:lang="pl">Dokument wejściowy Troff MM</comment>
<comment xml:lang="pt">documento origem Troff MM</comment>
<comment xml:lang="pt_BR">Documento de entrada Troff MM</comment>
<comment xml:lang="sq">Dokument input-i Troff MM</comment>
<comment xml:lang="sr">Troff MM улазни документ</comment>
<comment xml:lang="sv">Troff MM-indatadokument</comment>
<comment xml:lang="uk">Вхідний документ Troff MM</comment>
<comment xml:lang="vi">Tà i liệu nhập MM Troff</comment>
<comment xml:lang="zh_CN">Troff MM 输入文档</comment>
<glob pattern="*.mm"/>
</mime-type>
-->


You then need to add a file at /usr/share/mime/packages/freemind.xml with the following contents:

<?xml version="1.0" encoding="UTF-8"?>
<mime-info xmlns="http://www.freedesktop.org/standards/shared-mime-info">
<mime-type type="application/x-freemind">
<comment>FreeMind Mind Map</comment>
<glob pattern="*.mm"/>
</mime-type>
</mime-info>


Once you have edited/created these files, you need to update the MIME database:

sudo update-mime-database /usr/share/mime


To assign icons to the FreeMind .mm files, It turns out you have to create 48x48, 32x32, and 24x24 icons (PNG files) for FreeMind, copy these to /usr/share/icons/gnome under the appropriate size-named folders, and then update the icon cache. I used GIMP to create the icons based on an svg icon that came with the FreeMind source package. Each icon PNG must be named gnome-mime-application-x-freemind.png. To update the icon cache once these are in place:

sudo gtk-update-icon-cache --force gnome


Once you are done, log out and back in, and enjoy your FreeMind goodness.

NOW, if that all seems a bit much... I have created an archive containing a script that does everything except set up the main menu item pointing to FreeMind. It contains a version of FreeMind 0.9.0 beta 17 I compiled (on 64-bit Ubuntu, so this may or may not work on 32-bit versions) along with the modifications to the MIME types and the icons I created.

Download it here: freemind-0.9.0_Beta_17.tar.bz2


Monday, May 05, 2008

Integrating Ubuntu Hardy Heron 8.04 with Active Directory

I have three primary goals with integrating Ubuntu Server with Active Directory:
  • Join the server to the domain
  • Allow domain admins to be Ubuntu Server administrators
  • Allow Windows clients in domain groups access to Samba shares
Goal #1: Join the Server to the Domain

Thanks to this post for helping with this portion. The steps are:
  1. sudo apt-get update
  2. sudo apt-get install likewise-open
  3. sudo domainjoin-cli join fqdn.of.your.domain Administrator
  4. sudo update-rc.d likewise-open defaults
  5. sudo /etc/init.d/likewise-open start
Goal #2: Allow Active Directory Domain Administrators to Administer Ubuntu

Ubuntu Forums to the rescue... thanks, gotee12. This will allow members of the Domain Admins AD group to issue sudo commands. From a command prompt:
  1. visudo
  2. Add this line to the resulting file:
%YOURDOMAINNAME\\domain^admins ALL=(ALL) ALL
Note the carat symbol to substitute for spaces.

Goal #3: Allow Windows Clients in Domain Groups to Access Samba Shares

*** UPDATE *** My friend Chris got the plumbing to wire up Likewise Open with Samba figured out. Good grief, this was opaque:
http://chrplunk.blogspot.com/2008/06/allow-windows-clients-in-active.html

Now you have to set up your shares. The shares are defined as individual text files under /var/lib/samba/usershares. Create a file in this folder named with the name of the share (e.g. "test") and contents like the following, but be careful--match the spaces and casing with nothing extra, and **make sure the file name is in all lowercase regardless of the casing of the share name**:
#VERSION 2
path=/path/to/shared/folder
comment=
usershare_acl=<Group SID>:<access modifier>
guest_ok=y
For example:
#VERSION 2
path=/testShare
comment=
usershare_acl=S-1-1-0:F
guest_ok=y
To get the SID of the group that will have access to enter in the usershare_acl row, execute:
wbinfo -n "DOMAIN\group"
(S-1-1-0 is Everyone.)

The access modifiers after the group SID are as follows:
  • R - read-only
  • F - full access
  • D - deny access
The last thing you need do is to set the permissions on the shared folder itself. I found it easiest to give world-writable permissions to the folder, as it seemed not to dereference my group memberships at the folder permission level (unlike Samba at the share level). So:
chmod -R 0777 /path/to/shared/folder
If anyone knows how to get the group security to work at the folder level so it need not be world-writable, I'd appreciate a comment. I tried:
chgrp -R 'DOMAIN\group' /path/to/shared/folder
chmod -R 2770 /path/to/shared/folder
...but I kept getting access denied.

*** UPDATE 2 *** I had to grant read access to everyone for the usershares folder to avoid 'cannot stat' errors by ordinary users:
chmod o+r /var/lib/samba/usershares


Original post for this section follows:

Oooh, I haven't managed to get this one to work. I can issue successful commands like the following while logged on to the Ubuntu machine with my domain credentials:

smbclient -k -L //dmsc01
OS=[Windows Server 2003 R2 3790 Service Pack 2] Server=[Windows Server 2003 R2 5.2]

Sharename Type Comment
--------- ---- -------
C$ Disk Default share
IPC$ IPC Remote IPC
ADMIN$ Disk Remote Admin
OS=[Windows Server 2003 R2 3790 Service Pack 2] Server=[Windows Server 2003 R2 5.2]

Server Comment
--------- -------

Workgroup Master
--------- -------

So SOMETHING's working, but I can't manage to get remote machines to connect to hosted shares. I've tried the following smb.conf (key lines included):

workgroup = mydomain
security = ads
realm = MYDOMAIN.LOCAL
encrypt passwords = yes
idmap uid = 10000-40000
idmap gid = 10000-40000
template homedir = /dev/null
template shell = /bin/false
winbind separator = \
winbind use default domain = yes
winbind enum users = yes
winbind enum groups = yes
winbind cache time = 300
winbind nested groups = yes

#=====================Shares====================
[tmp]
path = /tmp
browseable = yes
writeable = yes
guest ok = no


All I get when attempting to connect, however, is errors like the following in the client logs:

[2008/05/05 10:27:14, 1] libads/kerberos_verify.c:ads_secrets_verify_ticket(237)
ads_secrets_verify_ticket: failed to fetch machine password
[2008/05/05 10:27:14, 1] smbd/sesssetup.c:reply_spnego_kerberos(316)
Failed to verify incoming ticket with error NT_STATUS_LOGON_FAILURE!

And from the log.winbindd-idmap:

[2008/05/05 10:25:11, 1] nsswitch/idmap_tdb.c:idmap_tdb_alloc_init(397)
idmap uid range missing or invalid
idmap will be unable to map foreign SIDs
[2008/05/05 10:25:11, 0] nsswitch/idmap.c:idmap_alloc_init(750)
ERROR: Initialization failed for alloc backend, deferred!


Any ideas?

Wednesday, April 30, 2008

Silverlight 2.0 integration with Windows Forms

Here's how you can host Silverlight 2.0 beta 1 applications in existing Windows Forms applications and have two-way communication between them. There may be an ActiveX approach that will accomplish this, but the approach I took was with a WebBrowser control.

First, set up the Windows Forms client. I'll use Form1, the hardest working form of them all. I simply drag the WebBrowser control onto the form. In its constructor, I set a few properties needed for having the embedded WebBrowser:


public partial class Form1 : Form {
public Form1() {
InitializeComponent();

webBrowser1.AllowWebBrowserDrop =
webBrowser1.IsWebBrowserContextMenuEnabled =
webBrowser1.WebBrowserShortcutsEnabled = false;
webBrowser1.ObjectForScripting = this;

webBrowser1.Navigate("http://<url of Silverlight application>");
}


I also added a property and a method in the Windows Form for the hosted Silverlight application to call:


public void ButtonClicked(string message) {
MessageBox.Show("ButtonClicked: " + message);
}

public string Test {
set {
MessageBox.Show("Test: " + value);
}
}


In the Silverlight application, use managed code like the following (e.g. in a click event handler, load event, etc.) to call the custom methods on the hosting form (note that you need a reference to System.Windows.Browser to get to the browser):


using System.Windows.Browser;
/* ... */

string msg = "Clicked at " + DateTime.Now.ToString();
HtmlWindow w = HtmlPage.Window;
ScriptObject o = (ScriptObject)w.GetProperty("external");
if (null != o)
{
try
{
// Set a property value on the host form
o.SetProperty("Test", msg);

// Call a method on the host form
o.Invoke("ButtonClicked", new object[] { msg });
}
catch { }
}


Note the catch block: I haven't yet discovered how to detect if the Silverlight application is being hosted in a WebBrowser from inside (if it is being run directly in a browser, the 'external' object exists but invoking custom properties and methods will fail).

Calling methods in the Silverlight application from the WebBrowser control is a bit more complex and involves a few steps:

1) Stage the Silverlight application and methods for scripting

In App.xaml, you must register each Silverlight page for scripting support. For example, if I have a page called Page, I need code like the following:


Page p = new Page();
this.RootVisual = p;
HtmlPage.RegisterScriptableObject("Page", p); // The identifier ("Page") here is arbitrary and refers to your key for identifying the object from script


Now that I've done this, I have to mark each Silverlight page class with the ScriptableType attribute:


[ScriptableType()]
public partial class Page : UserControl
{
/* ... */


Also, each public method I intend to call in the marked class from external script must be marked with the attribute:


[ScriptableMember()]
public void SetSearchText(string msg)
{
/* ... */


2) Set up scripting support in the web page hosting the Silverlight application

The WebBrowser control can call script methods within the page, but doesn't seem to be able to call the Silverlight control object directly (I made several attempts to do this but was unsuccessful). What I ended up doing that worked was to set up a script method corresponding to each method I want to call within the Silverlight application.

First, alter the tag on the Silverlight control so that it calls a script method of yours when it loads:


<div style="height:100%;">
<asp:Silverlight ID="Xaml1" runat="server" Source="~/ClientBin/MySilverlightApp.xap" Version="2.0" Width="100%" Height="100%" OnPluginLoaded="pluginLoaded" />
</div>


Now, add a script block in the HEAD tag with a method corresponding to the above to store a reference to the Silverlight control when it loads:


<head runat="server">
<title>Test Page For DiggSample</title>
<script type="text/javascript">
var scControl;

function pluginLoaded(sender) {
scControl = sender.get_element();
}
</script>
...


Next, add one script method for each method you marked exposed within the Silverlight application. Note the formatting (you must call it in the form: objectName.Content.<name you chose as the Silverlight script object identifier>.method(arguments)):


<script type="text/javascript">
function SetSearchText(msg) {
scControl.Content.Page.SetSearchText(msg);
}
</script>


Finally, from within the Windows Forms application, you can call the method you exposed via the WebBrowser control as follows:


private void btnSetSearchText_Click(object sender, EventArgs e)
{
webBrowser1.Document.InvokeScript("SetSearchText", new string[] { "foo" });
}


That's it--you should be able to have two-way communication between the Windows Forms application and the Silverlight application hosted via its WebBrowser control.

Tuesday, April 29, 2008

Debugging Kerberos authentication issues

I have found the following registry key to be of greatest assistance when debugging Kerberos issues. It sets the following parameters:
  • Turns on verbose debug logging
  • Forces Kerberos to use TCP instead of UDP (MaxPacketSize parameter)
  • Increases the token size so that users with large numbers of groups will fit inside the Kerberos ticket
Just save the following as a .reg file and double-click it on your server to enter it into the registry.

----COPY BELOW THIS LINE----
Windows Registry Editor Version 5.00

[HKEY_LOCAL_MACHINE\SYSTEM\CurrentControlSet\Control\Lsa\Kerberos\Parameters]
"LogLevel"=dword:00000001
"KerbDebugLevel"=dword:ffffffff
"LogToFile"=dword:00000000
"MaxTokenSize"=dword:0000ea60
"MaxPacketSize"=dword:00000001

----COPY ABOVE THIS LINE----

PerformancePoint 2007 Monitoring Server per user authentication


I had an interesting time getting Kerberos authentication working for PerformancePoint 2007 Monitoring Server. The deployment guide is pretty thorough, but I had some issues getting the Kerberos authentication to function. After making the changes recommended in the guide for Kerberos auth and per-user security, the Dashboard Designer would produce the following error when trying to refresh:

Unable to connect to the specified server. Make sure the address is correct.


After reviewing Kerberos logging messages, I found that this was a Kerberos error. I used adsiedit to set SPNs rather than the SetSPN utility as I find it a bit faster to work with. I set the service principal names above on the Monitoring Server application pool identity domain account (locate the account in the tree, right-click and choose Properties, select the servicePrincipalName attribute, and click Edit). This is because:
  • My PPSMonitoring web runs on the dppt01 server on port 40000;
  • My PPSPlanningWebServices web runs on the dppt01 server on port 46787; and
  • My PPSPlanningAdminConsole web runs on the dppt01 server on port 46788.
This wasn't sufficient to make it work, however. I also had to:

- Set one more SPN (for both the short and fully-qualified domain name) on both the server's computer account and the Monitoring Server application pool identity:
  • HTTP/dppt01.domain.local
  • HTTP/dppt01
- Change the application pool identity of the PPSMonitoringCentral app pool (for some reason, the installer defaulted this to Network Service instead of my app pool identity, ppt-pool-dev).

After doing these steps and allowing for replication, Dashboard Designer was again able to connect and enumerate resources.

Friday, April 25, 2008

Integrating PerformancePoint 2007 into MOSS

Being new to PerformancePoint 2007, it wasn't immediately apparent to me how to integrate it into MOSS. I found that you do this by installing the Dashboard Viewer for SharePoint Services on the MOSS server.

Prerequisites on MOSS Server
  • Microsoft ASP.NET 2.0 AJAX Extensions 1.0
Installation
  1. Mount the PerformancePoint 2007 media in the MOSS server.
  2. Choose the Monitoring Server installation and complete it.
  3. Run the Monitoring Server Configuration Manager.
  4. Uncheck all options except for the Dashboard Viewer for SharePoint Services.
  5. Select the site collection in which to install the Dashboard Viewer.
If you need to later install the Dashboard Viewer web part on an additional site collection, this post has an excellent guide to doing so. In step 2 where the author references uploading the master page, I did this differently:
  • Navigated to http:///_catalogs/masterpage/Forms/AllItems.aspx, and clicked the Upload button.
  • Browsed to %programfiles%\Microsoft Office PerformancePoint Server\3.0\Monitoring\Assemblies\ and chose PerformancePointDefault.master.
  • Once uploaded, used the context menu on the uploaded master page and used the Approve/Reject link to approve the uploaded item.

Tuesday, April 22, 2008

Further adventures with Citrix WISP installation

Continuing with earlier efforts to get WISP working, I attempted to re-add/re-deploy the solutions after first undeploying/removing them. Prerequisite steps:

Turn on WISP logging. You can import the following registry key to do so (save as a .reg file and double-click it; don't forget to actually create the folder):

------COPY BELOW THIS LINE-----
Windows Registry Editor Version 5.00

[HKEY_LOCAL_MACHINE\SOFTWARE\Citrix\WISP]
"LogFolder"="C:\\temp\\WISP_logs"
-----COPY ABOVE THIS LINE-----

Turn on verbose MOSS (ULS) logging:
  1. Open Central Administration, click Operations.
  2. Click Diagnostic Logging.
  3. Under the Event Throttling section, set Verbose in "Least critical event
    to report to the trace log."
  4. Under the Trace log section, type 20 in Number of log files.
  5. Click OK.

To add the solutions:

stsadm -o addsolution -filename CitrixWssCore.wsp
stsadm -o addsolution -filename CitrixAppDeliveryWebPart.wsp
stsadm -o addsolution -filename CitrixContentRedirection.wsp
stsadm -o addsolution -filename CitrixMossCore.wsp

While adding seems to be pretty safe, you have to be very careful about the order of deployment of the various WSPs. The CitrixWssCore.wsp must be deployed first, and this deployment doesn't necessarily work. You must carefully review stsadm output to see what your results were before proceeding. After initiating the deployment, check the Timer Job Status page in CA to see if the job is complete and/or run stsadm -o enumsolutions and look for the solution in the list with the Deployed node set to true.

stsadm -o deploysolution -name CitrixWssCore.wsp -immediate -allowgacdeployment

On this attempt, I was deploying CitrixWssCore.wsp first as directed. Note the value of the LastOperationResult node:

<Solution Name="citrixwsscore.wsp">
  <Id>fe3deba9-9b5d-4105-9983-2af1db3c0e42</Id>
  <File>CitrixWssCore.wsp</File>
  <Deployed>FALSE</Deployed>
  <WebApplicationSpecific>FALSE</WebApplicationSpecific>
  <ContainsGlobalAssembly>TRUE</ContainsGlobalAssembly>
  <ContainsCodeAccessSecurityPolicy>FALSE</ContainsCodeAccessSecurityPolicy>
  <LastOperationResult>DeploymentFailedFileCopy</LastOperationResult>
  <LastOperationTime>4/21/2008 4:14 PM</LastOperationTime>
</Solution>

I didn't find any particular reason for this failure, but I repeated the operation, and the next time got success values in these nodes.

Once I deployed the key prerequisite package, it was on to the others. The CitrixAppDeliveryWebPart also balked:

<Solution Name="citrixappdeliverywebpart.wsp">
  <Id>8a0a1be2-7648-4703-9cca-8ea0fa625793</Id>
  <File>CitrixAppDeliveryWebPart.wsp</File>
  <Deployed>FALSE</Deployed>
  <WebApplicationSpecific>TRUE</WebApplicationSpecific>
  <ContainsGlobalAssembly>FALSE</ContainsGlobalAssembly>
  <ContainsCodeAccessSecurityPolicy>TRUE</ContainsCodeAccessSecurityPolicy>
  <LastOperationResult>DeploymentFailedFeatureInstall</LastOperationResult>
  <LastOperationTime>4/22/2008 10:34 AM</LastOperationTime>
</Solution>

This also occurred on my second attempt. So I started digging through the MOSS ULS logs (it's a good idea to turn on verbose logging before starting operations like this, as exceptions do not generally get logged to the Windows event log). I found the following key message:

Line 19554 : 04/22/2008 10:41:33.12 OWSTIMER.EXE (0x058C) 0x1404 Windows SharePoint Services Topology 8zpd High Solution Deployment : Error - Add Feature definition for citrixappdeliverywebpart.wsp Exception message - A feature with ID 94af8a34-19db-4114-876d-5a7a587a8405 has already been installed in this farm. Use the force attribute to explicitly re-install the feature.

Apparently, the uninstall procedure (I had made earlier attempts to install these solutions) did not properly remove the features. I was able to get this one to pass by adding the -force switch to the stsadm deploy solution command.

stsadm -o deploysolution -name CitrixAppDeliveryWebPart.wsp -immediate -allowgacdeployment -allowcaspolicies -url http://server -force

After this, I forced the remaining solution deployments as well (CitrixContentRedirection.wsp and CitrixMossCore.wsp) and the rest succeeded.

stsadm -o deploysolution -name CitrixContentRedirection.wsp -immediate -allowgacdeployment -force

stsadm -o deploysolution -name CitrixMossCore.wsp -immediate -allowgacdeployment -force


After deployment of these features comes activation. Unless your application pool identity has admin privileges in various areas (this should not be the case), you will need to use the stsadm commands to activate the features. You must activate the CitrixAccessCore feature, and you must activate it before the others. Fortunately, activation does not use a timer job, so you get immediate feedback from stsadm about the success or failure of your request.

stsadm -o activatefeature -name CitrixAccessCore -url http://server
stsadm -o activatefeature -name CitrixTopNavigation -url http://server
stsadm -o activatefeature -name CitrixQuickLaunchNavigation -url http://server
stsadm -o activatefeature -name CitrixAdministrationTool -url http://server
stsadm -o activatefeature -name CitrixAppDeliveryWebPart -url http://server
stsadm -o activatefeature -name CitrixContentRedirectionModule -url http://server
stsadm -o activatefeature -name CitrixContentRedirectionMenu -url http://server
stsadm -o activatefeature -name CitrixContentRedirectionNewMenu -url http://server


The key step after getting everything installed is to configure the connection to the Citrix farm. From the site collection root, go to Site Settings | Modify All Site Settings > Citrix Administration and specify the applicable settings. At first I tried going to the Advanced Administration and copying the contents of our Citrix farm's WebInterface.conf file into the large textbox, but that is not sufficient.

Now if I could just get past the "No Resources found" message presented by the Citrix Application Delivery web part...

*** UPDATE ***
I got the Application Delivery web part working. It turned out the CitrixWssCore feature did not deploy properly in spite of the success message returned by stsadm -o enumsolutions. The contents of the WISP logs were the only place I saw the exception:

AccessCore.DeploymentJob: Wednesday, April 23, 2008 1:36:01 PM
Service Provider Deployment run as Identity: DOMAIN\server-farm-account
CreateEventLog() Error: Requested registry access is not allowed.
at System.ThrowHelper.ThrowSecurityException(ExceptionResource resource)
at Microsoft.Win32.RegistryKey.OpenSubKey(String name, Boolean writable)
at System.Diagnostics.EventLog.CreateEventSource(EventSourceCreationData sourceData)
at System.Diagnostics.EventLog.CreateEventSource(String source, String logName)
at Citrix.WISP.Util.CoreLog.CreateEventLog(CultureInfo locale)
....
Info: Attempting to create Web Virtual Directory (CitrixAccessPlatform-f6ec3ff1-328a-4fdf-b78b-61f0f5b703d0):
ADS Path: IIS://localhost/W3SVC/1634379371/Root/f6ec3ff1-328a-4fdf-b78b-61f0f5b703d0
File Path: C:\Program Files\Common Files\Microsoft Shared\Web Server Extensions\12\CitrixAccessPlatform\f6ec3ff1-328a-4fdf-b78b-61f0f5b703d0
IISObject: Exception has been thrown by the target of an invocation.

Our MOSS server farm account was not a local machine administrator on the SharePoint machine, and apparently this is required for the CitrixWssCore deployment to create the custom event log and its web site. I had to grant these rights and the redeploy the solution with the -force option to correct it. The key point is that you must review all possible logs, including the WISP logs, to check for installation/deployment problems.

Citrix, won't you please build a real installer for WISP that will take care of some of these details/checks?